In questo trattato dedicato alla realizzazione del dipinto Gold Ice olio su tavola di dimensioni 25x35 cm, analizzeremo in maniera accurata tutti i vari passaggi relativi alla tecnica di esecuzione  in maniera chiara con video , foto e descrizioni . Il dipinto in analisi raffigurante un paesaggio invernale , è stato eseguito secondo la tecnica usata dalla antica  Scuola Napoletana, nonchè unita a quest'ultima, la mia esperienza artistica strettamente personale . Spero di comunicare a coloro che con interesse si avvicinano a questo genere di pittura, il miglior contributo, con l'auspicio di rimanere in ognuno una esperienza valida e costruttiva che sicuramente aiuterà nel percorso soggettivo di coloro che con passione conseguono la strada della pittura.   Fatta questa piccola premessa, vediamo da qui in seguito tutte le fasi dimostrative per la realizzazione del dipinto, munitevi di buona pazienza e buon lavoro...... 

In this treatise dedicated to the creation of Ice Gold painted oil on canvas size 25x35 cm, we'll analyze accurately all the various steps involved in running technique clearly with videos, photos and descriptions. The painting depicting a winter landscape analysis was performed according to the technique used by the ancient Neapolitan School, as well as united to the latter, my strictly personal artistic experience. I hope to communicate to those with interest close to this kind of painting, the best contribution, in the hope of staying in each one a good and constructive experience that will surely help you in the path of those who passionately subjective achieve the way of painting. After this short introduction, we can see from henceforth all stages demonstration for the creation of the painting, equip yourself with good patience and good work


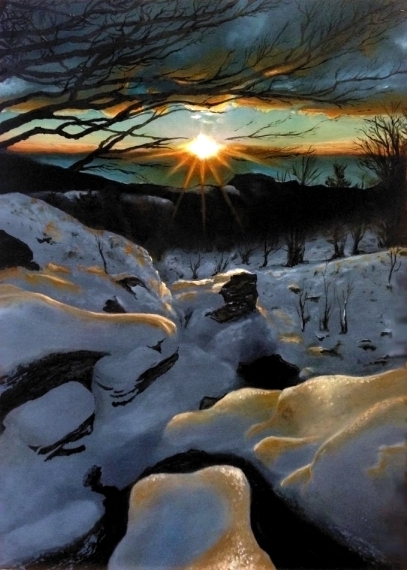
questo è il nostro dipinto da realizzare

this is our painting to be carried out 


Partiamo da una tavoletta di legno , generalmente uso legno multistrato di spessore di mm14-18 , uso questo tipo di legno in quanto è meno soggetto nel tempo alla deformazione, in questo caso ho preferito una tavoletta rivestita di laminato plastico al fine di rendere il supporto perfettamente liscio, dopo averla pulita per bene , ho applicato il colore, che come possiamo vedere in foto si presenta nero , ma in realtà è un nero con una parte (solitamente 1/4) di terra di Siena bruciata per un motivo molto semplice, ovvero, per dar modo successivamente all'eventuale colore nero assoluto di evidenziarsi comunque. Quando applicherete il colore di fondo (almeno 2 mani ), prestate attenzione nell'ultima stesura di non rimanere solchi di pennello , consiglio di "accarezzare" il colore con un pennello tipico per velatura denominato "ventaglio" . Per una maggiore rapidità di essiccazione usate essiccativo al cobalto , per la diluizione dei colori l'olio di papavero, un po' più costoso ma efficiente per mantenere intatto il tono dei colori chiari in quanto quello di lino tende ad ingiallire nel tempo.

We start from a wood tablet, generally I use plywood thickness of mm 14 -18 , I use this type of wood because it's less subject to deformation over time , in this case I preferred a tablet coated with plastic laminate in order to make the support perfectly smooth after it has been cleaned thoroughly, I applied the color, which as we can see in the photo looks black, but in reality it is a black with a portion (usually 1/4) of burnt Siena for a verysimple reason , or , to give a way that subsequently to the possible absolute black color to stand out anyway. When you'll apply the background color (at least 2 hands ) , be careful not to get the last draft of the grooves of the brush, I advice to you to " caress " the color with a brush for a typical haze called "fan" . For a faster drying cobalt drier use for the dilution of the colors "oil poppy" , it's a bit more expensive but it's more efficient to maintain the tone of light colors as that of flax tends to yellow over time.


Dopo atteso che il fondo sia bene asciutto, passiamo alla prima fase del dipinto, iniziando dal cielo compreso le sue sfumature di fondo, ovviamente prima di iniziare il dipinto , è buona norma "osservare" l'immagine da dipingere, io a volte lo faccio per  ore,  ovvero per giorni interi analizzo attentamente la strategia di esecuzione del dipinto, ossia, quali zone dipingere per primo e come ottenere risultati di colori sfumati, velati ecc... Questo e' molto importante per un buon esito di un'opera , quindi consiglio per prima cosa di analizzare bene i colori aiutandovi con un software di grafica, io uso Corel Photo Paint vers. 7 con cui adoperando lo strumento "contagocce" estrapolo il campione di colore che mi interessa e la sua composizione ( solitamente in RGB ) . Questo e' molto importante perché non sempre ciò che vediamo è legittimo al colore che si crede di osservare, per esempio , il colore della neve del dipinto in questione è praticamente grigio con un pizzico di blu, ma i nostri occhi , di primo approccio lo formalizzano come un bianco. Questo succede per vari motivi , ed è giusto così , in quanto il colore varia a seconda della luce che riceve e dal contesto in cui si trova relativamente agl'altri colori  che lo circondano. Per apprendere bene questo concetto , provate a fare un quadrato di un qualsiasi colore prima su fondo bianco e poi su nero , vedrete che nell'osservare alternando gli  occhi su entrambi, il colore che ha il fondo nero vi apparirà più chiaro di quello affianco che in realtà è lo stesso colore.          

After expected that the bottom is dry , we pass the first stage of painting , starting with the sky background including its nuances , of course, before you start painting , it is a good idea to "observe " the image of painting, I sometimes do it for manny hours or for days carefully I analyze the implementation strategy of the painting, that's, which areas to paint and how to get results for the first gradient color , veiled, and so on ... This is very important for a successful outcome of a work , so I recommend to you first analyze the colors well with the aid of a graphics software , I use Corel Photo Paint vers . 7 striving with which the tool " eyedropper " I extrapolate the color swatch that interests me and its composition (usually in RGB). This is very important because what we see is not always legitimate to the color that is believed to be observed , for example, the color of the snow of the painting in question is basically gray with a hint of blue, but our eyes , to the first approach we formalize as a white color. That happens for various reasons , and rightly so ,because the color changes depending the light that receives and from the context in which it is relatively located to the others colors that surround it. To know this concept , try to draw a square of any color before on white and then black , you we'll see that observing them alternating on both eyes , the color that has the black background it will appear to you lighter of that next , that actually it's the same color .


Iniziamo a dipingere il cielo fino all'orizzonte coi colori blu di Prussia, verde smeraldo e un po' di lacca di garanza, notate nel video  la linea alta delle montagne che opportunamente ho tracciato prima usando un colore qualsiasi chiaro giusto per intravederla , cio' serve per proporzionare la sfumatura di ocra gialla e giallo cadmio arancio che e' all'orizzonte. Le montagne sono dello stesso colore del cielo ma sostanzialmente molto piu' scuro. Con il pennello a ventaglio sfumate i colori affinchè diventino uniformi e gradualmente varianti nei toni.         

We begin to paint the sky to the horizon with the colors of Prussian blue, emerald green and a bit 'of madder lake, we can notice in the video the high line of the mountains which I traced properly before using any color light just to glimpse it, that' serves to proportion the shade of yellow ocher and orange cadmium yellow that's to the horizon. The mountains are the same color as the sky, but substantially much darker. With the fan brush soft thecolors for you to become uniform and gradually variations in shades.


video

 .


Una volta completata per bene ed asciugatasi la procedura del video di cui sopra, passiamo alla sfumatura della luce che rimbalza dal basso delle montagne interposta tra loro. Ho usato il colore del cielo un po' piu' chiaro usando anche le dita per sfumare il colore. Con un pennellino a punta molto sottile, calchiamo il bordo alto della montagna con lo stesso colore e in seguito rettifichiamo la parte scura di sotto con il colore usato per il fondo.   

Once completed and dried the procedure of the the above video, we move to the shade of light, that bounces from the bottom of the mountains. I used the color of the sky a little  more clear even using your fingers to shade the color. With a very thin paintbrush, we adjust the upper edge of the mountain with the same color and then we rectify the part darker below with the color used for the bottom.


video .


In questa sequenza diamo  sul tratto alto laterale delle montagne una base di terra di Siena bruciata, le nuvolette striate con un giallo di Napoli molto chiaro ed una velatura di terra di Siena bruciata con giallo cadmio arancio, naturalmente il tutto rispettando i tempi di essiccazione. Subito sopra le nuvolette striate, daremo una stesura con colore piuttosto fluido di giallo di Napoli da stendere bene sfumando la parte piu' alta con piu' tono.       

In this sequence we give on the upper stretch lateral of the mountains, a base of burnt Siena,the clouds streaked with a very light Naples yellow, veiling later burnt Siena cadmium yellow with orange of course respecting the drying times. Right away above the clouds streaked, we will give a drawing up with color rather fluid Naples yellow to spread good fading the most 'high with more' tone.


video .


Adesso inizieremo ad improntare il sole , di fondo daremo un colore di terra verde chiaro aspettando che si asciughi, con l'ocra gialla e un pizzico di arancio partiremo dal centro sfumando nel contorno e sui lati, lo stesso faremo col giallo di Napoli mantenendoci però in un ambito piu' ristretto, infine col bianco inizieremo a schiarire il centro.      

Now we will start sketching the sun, we will give a bottom color to light green ground, with yellow ocher and a little orange,we start from the center fading the outline and on the sides, the we will do the same with Naples yellow, however, keeping us in a scope more' restricted, eventually we will start with the white to brighten the center.

video .


Continuiamo ancora con la parte centrale del dipinto, direi forse la piu' elaborata almeno per cio' che riguarda l'effetto dinamico del chiaro scuro che darà come risultato finale all'elaborato.  Il sole in questo dipinto rappresenta il punto cardine di tutta la scena, nel senso che oltre alle molteplici sfumature di luce che deve generare , e' anche la parte centrale del dipinto, dove assieme alla neve in basso , raccoglie l'attenzione iniziale dell'osservatore. I colori da usare sono terra di Siena bruciata, ocra gialla, giallo arancio cadmio, giallo di Napoli e bianco per il punto centrale del sole. Vediamo con quale sequenza e quali fasi hanno priorità riguardo l'applicazione...........       

Let's continue with the central part of the painting, I would say the most 'important at least for what relates to the dynamic effect of light and shade which shall result in the elaborate final. The sun on this painting represents the pivotal point of the whole scene, in the sense that in addition to the numerous shades of light that should generate, it is also the central part of the painting, where together with the snow down, gathers the initial attention of the observer. The colors to use are burnt Siena, yellow ocher, yellow cadmium orange, Naples yellow and white for the center point of the sun. Let's see what sequenceand which ones phases they have priority regarding the application ...........

video .


Ora è il momento delle nuvole, useremo per la bozza un pennello piuttosto grande a sezione tonda, per i colori sono gli stessi usati per la base del cielo sicuramente di tono molto piu' scuro. Nella foto sottostante le parti piu' chiare sono praticamente le zone di fondo che si intravedono la dove c'e' uno spessore minore di colore. Il pennello tondo grande che vedrete passare con senso rotatorio serve a "diffondere" quei tratti incerti di pigmento, che,  con questo metodo sfumano nelle zone piu' sature di colore dando così un effetto piu' realistico. Detto pennello va sempre usato pulito ed asciutto, mai usarlo sporco d'olio o peggio di diluenti in quanto vi causerà un vero e proprio pasticcio miscelando tutti i colori freschi applicati.

Now is the time of the clouds, we will use a paintbrush rather large round section for colors are the same ones used for the base of the sky definitely much darker tone. In the picture underlying the lighter parts of are pretty much the background areas which are seen where there is' a thickness of less than color. The large round paintbrush The large round brush that you will see pass with circular movements serves to "spread" those traits uncertain of pigment, which, with this method fading in the areas most saturated color  thus giving an effect more realistic. That said paintbrush used must always clean and dry, never use it dirty oil or worse diluents because there will cause a real mess by mixing  all the fresh colors applied.


video .


Coi colori terra di Siena bruciata, giallo ocra, giallo di cadmio arancio e giallo di Napoli, creiamo l'effetto di luce al tramonto sotto le nuvole. Partiamo dai toni piu' scuri in modo che  possiamo sempre tenere sotto controllo l'intensità di luce data con attenzione di non eccedere e quindi sbagliando di saturazione di alcuni punti. Il colore terra di Siena bruciata viene applicato a seconda del risultato voluto, nei casi dove deve essere solo un colore brunito della nuvola , vi consiglio di usare il colore così come è, mentre dove lo si vorrà schiarire possiamo aggiungere sia un po' di giallo di Napoli oppure del giallo di cadmio arancio, dove, nel primo caso avremo un colore piu'  chiaro, mentre meno acceso ed accentuato per il secondo. Col giallo ocra e giallo di cadmio arancio possiamo ottimizzare i toni medi della sfumatura e completare coi colori piu' chiari come il giallo di Napoli. Notate come in questa fase si inizia a distinguere quell'alone di luce che circoscrive la parte alta del sole , effetto che si ottiene con un color carne. 

With the colors of burnt Siena, yellow ocher, cadmium yellow orange and yellow of Naples, we create the effect of light at sunset under the clouds. Let's start with darker tones so that we can always control the intensity of light, attentively not to overdo it and therefore not to make mistakes saturation a few points. The color burnt Siena is applied  depending on the desired result, in the cases where it needs to just be a burnished color of the cloud, I recommend you use the color as it is, while where want to brighten up we can add a little bit of Naples yellow or yellow cadmium orange, where,In the first case we will have a lighter color, while varying in intensity and accentuated by the second.
With yellow ocher and cadmium yellow orange we can optimize the mids of the gradient completing with lighter colors such as yellow of Naples. Notice how in this phase begins to  distinguish halo of light that circumscribes high part of the sun, effect that you get with a flesh-colored.


video .


Completamento della seduta precedente cercando di dare sempre piu' l'intento di realtà cercando di iniziare a curare i dettagli a proprio piacimento.

Completion of previous sitting trying to give more and more the intent of actually trying to begin take care of the details to your liking.


video .


A questo punto occupiamoci anche della parte che si intravede dietro le nuvole, ovvero il cielo in trasparenza, come notate nella foto ho esaltato alcuni tratti con del celeste (colori usati inizialmente per il fondo) ed ho sbiadito generalmente con un grigio chiaro la maggior parte delle nuvole facendo risaltare pero', usando la terra di Siena bruciata, alcuni punti in maniera da dare al contesto intero una certa tridimensionalità.

At this point, also deal with of the part that is visible behind the clouds, or in the sky transparency, as noticed in the photo I have exalted some traits with the blue (colors used initially for the fund) and I faded generally with a light gray most of the clouds making it stand out, however, using the burnt siena, some points so as to give context to the entire a certain three-dimensionality.


video .


Ritocchiamo ancora la sfumatura bassa delle nuvole......          Retouching still the gradient of low clouds ......


video .


Ancora nel dettaglio delle nuvole e in particolare l'aggiunta di una velatura di giallo di Napoli ai lati del cielo. Detta velatura e' molto importante ai fini dell'effetto realistico del cielo , in quanto , quel giallo che accarezza il celeste di fondo , da un risultato cromatico incline al verde che non riusciremmo mai a darlo facendolo di prima applicazione. 

Even in the details of clouds and in particular the addition of a veiling Naples yellow to the sides of the sky. Such veiling is very important for realistic effect of the sky, because that yellow caressing the blue background, as a result prone to green color that we could never give it doing it in the first application.

video .


E' giunto il momento dei rami che si interpongono nella scena. Usiamo un nero sempre con una quarta parte di terra di Siena bruciata, con dei pennelli a punta sottile possiamo iniziare a dipingere i rami. Prima di iniziare consiglio di umettare la parte da dipingere con uno strato leggerissimo di olio di papavero, al fine di agevolare il buon scorrimento dei pennelli a punta sottile. 

Now is the time of the branches that are interposed in the scene. We use a black always with a fourth part of burnt Siena, with a fine tip paintbrush we can begin to paint the branches. Before you start, I recommend that you moisten the part to paint with a lightweight layer of oil poppy in order to facilitate the smooth scrolling of the paint brushes a fine tip.


Prestiamo attenzione dove la tinta scura non tanto e' riuscita a coprire e ritocchiamo, ma soprattutto osserviamo bene l'insieme dei rami dipinti ritoccando quello che e' l'aspetto generale del risultato che si desidera. 

We pay attention not as much where the dark tint is able to cover and readjust, but especially look carefully at the set of branches of paintings, remodeling, what you is the  overall look of the result you want.


video .


Adesso vediamo come improntare la neve, per i colori useremo una base di grigio ottenuta da nero avorio e bianco di zinco aggiungendo pochissimo blu di Prussia. Dai video vediamo come inizialmente si tende a preparare una base con tratti piu' accentuati e zone meno intense giusto per avere una visione continua del disegno che in questo elaborato non e' previsto. 

Now let's see how to start the snow, the colors we will use a base made ??from black to gray and ivory white zinc adding little Prussian blue. From the video we see how we tend to initially prepare a base with traits more accentuated and areas that are poorly intense just to have a continuous view of the design in this elaborate is not expected.


video .


Arriviamo quindi ad ottenere il corpo raffigurante l'andamento del suolo ricoperto di neve , non preoccupatevi se man mano vedrete sparire le zone scure in quanto in seguito saranno riprese col nero.

We arrive therefore to get the body depicting the trend of the soil covered snow, do not worry as you will see if for the dark areas disappear because as a result will be taken  over with black.


video .


Sempre con lo stesso colore , con un pennello medio, applichiamo il colore a piccole macchie laddove vogliamo emulare la neve calpestata ( in alto a dx ) e subito dopo usando un pennello asciutto largo e tondo, accarezziamo velocemente la zona dipinta. La parte bassa ed a sinistra , faremo una velatura sempre con lo stesso colore che abbiamo preparato il fondo , servirà a dare piu' intensità se risulta essere un po' spenta.

Always with the same color,with a medium brush, we apply color in small patches where we want emulate the trampled snow (top right) and soon after, by using a dry brush broad and  rounded, quickly we caress the painted area. The lower part and to the left, we will make a veiling always with the same color as the background that we have prepared,will serve  to give greater intensity if it is a little off.


video .


Ancora ripetiamo la procedura di cui sopra......           Again we repeat the procedure referred to above ......


video .


v


Adesso dipingiamo gli alberi in profondità avendo cura  sempre di usare un pennellino piccolo cercando di sbiadire di tono quelli piu' distanti. Tale effetto lo si puo' ottenere avvalendosi anche della stesura di olio eseguita prima di iniziare, in quanto quel sottile strato di olio tende ad allargare e quindi a scolorire i piccoli quantitativi di pigmento come puo' intendersi un linea sottile. Un altro modo puo' essere semplicemente sbiadire il colore con una terra.

The time now we paint the trees in depth, taking care always to use a small fine brush trying to fade to tone those more distant. Such an effect. you can get making use of the  drawing up of oil performed before you start, because the thin layer of oil tends to broaden and therefore to discolor small quantities of pigment may be understood as a thin  line. Another way may be simply fade the color with a land.


video .

video .


Con il colore nero e terra di Siena bruciata, riprendiamo tutte le zone d'ombra che le velature precedenti hanno quasi coperto del tutto, ovviamente riferite a quelle di massima oscurità di tono , tipo la roccia, i vuoti, ecc... Con una terra ombra di vario tono , dipingiamo i tratti incerti delle rocce prima con un tono scuro e successivamente con accenti e striature piu' chiari. Diamo dei colpi di luce sulle zone di neve che riteniamo piu' esposte determinate ormai dalla scena giunta quasi al termine, il colore degli accenti di luce sulla neve è lo stesso usato in principio solo un po' piu' chiaro.

With black and burnt Siena, redo all the areas of shadow that the veiling previous they have covered almost entirelyobviously related to those of the darkest tone, like the rock, the voids, etc ... With a shadow land of varied tone, uncertain whether we paint the rocks before collecting a tone darker streaks and subsequently with accents and clearer. Giving of light strokes on the zones of snow that we believe most determined by now exposed from the scene almost junta to an end, the color of the accents on the snow is the same  principle used in only a little more clear.

video .

video .


Sporchiamo in alcuni punti della neve con un pennello asciutto di colore bruno per emulare le rocce in trasparenza , il calpestio e piccoli tratti di neve scioltasi comprese quelle piccole pietre che emergono dalla neve.

Get dirty the snow at some points with a dry brush brownish to emulate the rocks in transparency, the trampling and small parts of snow disbanded including small stones that  emerge from the snow.


video .

video .


Esaltiamo con tocchi di colore chiaro la neve in prima scena del dipinto , ovvero quella piu' vicina all'osservatore. Non usare mai il bianco assoluto il dipinto perderebbe un po' negli accenti degli altri colori della scena.

We exalt with touches of color clear the snow in first scene of the painting, or the one closest observer. Never use pure white, the painting will lose in the accents of other  colors of the scene.


video .


Con un pennellino piccolo rettifichiamo i punti che consideriamo piu' in vista e soprattutto piu' che rilevano il dettaglio tipo la neve residua ancora attaccata alla roccia in via di distacco di colore quasi trasparente. Terminiamo i raggi del sole che irrompono dall'orizzonte, usiamo la terra di Siena bruciata molto fluida per ottenere l'effetto di bagliore.

With a small fine brush we rectify the points that we consider most prominent and most above all that detect detail the type snow still residual attached to the rock nearing  detachment of color almost transparent. We conclude that the rays of the sun break into from the horizon, we use burnt Siena very fluid for get the glow effect.

video .


video .

Misceliamo il giallo ocra e la terra di Siena bruciata con una piccola parte di arancio , con questo colore molto fluido, assicurandoci prima che le zone da dipingere siano ben asciutte, iniziamo a velare le zone in luce che pensiamo siano tinte dai colori del tramonto. Col giallo di Napoli e ocra gialla di base , evidenziamo i piccoli punti luccicanti sulla neve.  

We mix the yellow ocher and burnt Siena with a small amount of orange, this color very fluid, making sure first that the zones to paint are perfectly dry, we begin to velar the  zones in light tints that we think are by the colors of sunset. With Naples yellow and ocher yellow base, we highlight the little dots on the glittering snow.

video .


Lasciamo asciugare bene il nostro dipinto per svariati giorni e successivamente passeremo lo strato di vernice brillante finale.   Il nostro dipinto e' giunto al termine......

We leave dry thoroughly for our painting several days and then we will pass the layer of varnish brilliant finish. Our the painting is come to an end ......

www.luigialba.com           Facebook profile     luigialbapainter@gmail.com